It's been while since i had posted something different from a tutorial, then because of this i will show a simple project to control a robotic arm. In my course on the university there's a old robotic arm called "robix", this is a educational kit that was bought to learn robotic in pascal, but with the over the years this was left for the students that are doing the last project of the course, that here we call this as TCC(final course project).
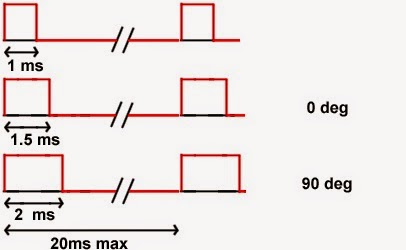
Seeing this kit i had thought how to control with the Tiva launchpad ARM, and searching a little about this i discovered that i need to generate six PWM's signals to control the servo motors in the kit. In this picture below you will see how is the signal that you need to generate to control a simple servo motor.
 Considering this i read the datasheet to discover how to generate a huge PWM time like 20ms. Viewing the feedback from the E2E forum i discovered that to generate this kind of PWM i will need a longer timer from the uC like the Wide Timer module, configuring this i need to discover the duty cycle from the servo motors in the arm to control the angles. The servo motors from the arm are the MG-995, and in this site you can see some parameters like the duty active of any kind of servo, then with this information i developed a library to control the robot and any kind of motor for the Tiva launchpad. In the "servo.h" file you have some parameters to define how your servo works, like the active duty cycle in micro-seconds for each servo and others.
/****************************************************************************
    ███████╗   ███████╗   ██████╗
    ██╔════╝   ██╔════╝   ██╔══██╗
    █████╗     ███████╗   ██████╔╝
    ██╔══╝     ╚════██║   ██╔═══╝
    ███████╗██╗███████║██╗██║
    ╚══════╝╚═╝╚══════╝╚═╝╚═╝

    SERVO MOTOR - API
    Author: Anderson Ignacio da Silva
    Date: 08/08/2014
    Target:PART_TM4C123GH6PM
    Inf.: http://www.esplatforms.blogspot.com.br

    PWM Pins:
    Channels  |   Pin
       0          PC4
       1          PC5
       2          PC6
       3          PC7
       4          PD0
       5          PD1

    Instructions:
        -To initialize just call InitServo()
        -Change the duty with SendServo(Channel,0-180 degrees)
        -If your servo has a different duty period, you can ch
         ange the time definitions in "servo_api.h"
        -Remember to change the MIN and MAX duty of each servo

****************************************************************************/

#ifndef SERVO_API_H
#define SERVO_API_H
 #include "servo_api.h"
#endif
// #ifndef SERVO_API_H
// #define SERVO_API_H
//  #include "servo_api.c"
// #endif

/*  Definitions       */
#define PWM_FREQUENCY   50
#define PWM_PERIOD      20000  //Time in us

/* Some times for popular motors
    -Time for max PWM servo (us)   MG995=2100 &  HS422=2300
    -Time for min PWM servo (us)   MG995=500  &  HS422=800
*/

#define MAX_SERVO_0     1900
#define MIN_SERVO_0      500

#define MAX_SERVO_1     1900
#define MIN_SERVO_1      500

#define MAX_SERVO_2     1900
#define MIN_SERVO_2      500

#define MAX_SERVO_3     1900
#define MIN_SERVO_3      500

#define MAX_SERVO_4     1900
#define MIN_SERVO_4      500

#define MAX_SERVO_5     1900
#define MIN_SERVO_5      500

#define MAX_SERVO_5     1900
#define MIN_SERVO_5      500
//#define DEBUG_SERVO

/*  Prototypes  */
void SendServo(uint8_t SelServo,uint8_t ValServo);
void CfgModPWM(void);
void CalcServo(void);
void InitServo(void);
To control the outputs you can see the .h file that has the instructions of how initialize and send position for the servo motors. To use this code you can copy from my repository in github and share your problems or doubts about the simple api for control servo motors. In this video below you see how the arm controls the robix using this api:
Thanks to read this post and see you next time.


No comments:
Post a Comment