Mar 28, 2015

MQTT + Websocket

Sometime ago I was thinking in study a IoT protocol, looking for some minutes in web I discovered that one of the most popular protocols that're running in nowadays is MQTT. MQTT is a protocol publish-subscribe type very interesting because was created by IBM a long time ago, used in internal communication with servers and clusters, now we use this to integrate many different devices in a flexible network that can be managed where will you're. The protocol works with a simple topology, in this network you need to have a Broker(concentrator), similar to an Access Point, and the Clients or devices.
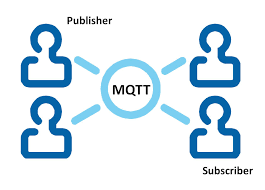
The Clients can publish or subscribe in Topics, those are managed by the broker. When a client subscribe a topic, he will receive all data published to this topic, and if he want he could publish in whatever topic in the network. It's real simple as I describe, and you can test on your PC in five minutes to confirm, but the best thing about this protocol is your port to TCP/IP stack, imagine that you're on a trip and you forgot to turn off your skip iron, if you have implemented MQTT in your home, you can connect to the internet and publish a simple "turn off" or "off" in a topic called, "iron clothes" now you drive safe without to back home. One of variants of this protocol are the port to WSN (Wireless Sensor Networks) with MQTT-SN, that is the same protocol but in different radios technologies, some ZigBee devices have fully compatible support to communicate with protocol and you can study how to implement in different applications and scenarios. Now I will teach how to install a broker MQTT and communicate him with a webscoket.

1 - First things first is to search for a lightweight/versatile broker, for the moment let's use MOSQUITTO

su #Insert your root password
apt-get install cmake libssl-dev build-essential
cd ~
git clone https://github.com/aignaciors/libwebsockets.git
cd libwebsockets/
mkdir build
cd build
cmake ..
make
make install
cd ~
git clone http://git.eclipse.org/gitroot/mosquitto/org.eclipse.mosquitto.git
cd org.eclipse.mosquitto

Now, open the file config.mk and edit the line "WITH_WEBSOCKETS:=no" change to yes and change "WITH_SRV=yes" to no .After install the pre-reqs. to compile mosquitto broker...
apt-get install uuid-dev xsltproc docbook-xsl
make
make test
make install
ln -s /usr/local/lib/libwebsockets.so.5 /usr/lib/libwebsockets.so.5
/sbin/ldconfig #Update the linker

Feb 16, 2015

Restoring an old laptop LCD

Since my hp laptop die by a George Foreman Grill temperature processor, I decided to recycle him or some parts but I didn't  have idea of how to do this until a time ago. I bought a LCD controller and I removed the LCD from the laptop, now I get a extended monitor that costs me 23$(ebay price of controller), see below some photos of this:


Feb 12, 2015

Upgrade Debian 7.8 to 8.0

After I started to use Debian 7.8 with gnome 3.4 (that's who comes with the image) I realized that some extensions that I want to use aren't supported in this version of gnome . If you see in the Debian website, the stable version launched in 10 of January of 2015 is perfect, but still use the gnome 3.4 and I preferred to upgrade my version to test once, a unstable testing version. The unstable version, "Jessie" in Debian 8 it's great and comes with gnome 3.14!!!! The steps that I follow are simple and remember to do by your own risk, try to test before in a virtual machine.
1- First update the source list replacing all words of "wheezy" by "jessie"  in the "/etc/apt/sources.list".
2- After update and install all packages:
su
apt-get update
apt-get upgrade
apt-get dist-upgrade
And go to prepare a cup of coffee, mainly if your internet is slow......It takes sometime to finish, but in the end you will be happy to see a image like this:

Feb 11, 2015

Wallpaper of the blog

This is a wallpaper of the blog, like everyone who is inspired by GNU/Linux philosopy...it's in 1600x900 because of my monitor, and if you want in higher resolution, just ask!

Feb 7, 2015

8x8 RGB Matrix Booster Pack in Tiva Launchpad

Like i promise, almost in the end of the week, here is another post. In four months ago i bought this booster pack from tindie and i forgot to read that the board didn't come with components, dammit!. I need to buy all the components from ebay.com because there's no store to buy SMD components here where i live, i start to buy and after two long months, all components arrived from our Chinese friends. I also forgot to read that besides the components, there isn't library for use this on Tiva launchpad, but reading the code, is very simple to port to other uControllers. I re-write the code from RobG that is for msp430, and i added in the github to use in the Tiva Launchpad. The API is very simple and the board use a TLC5947, that's PWM LED driver where you send the data through serial (SPI) of each LED(R.G.B) and a 74HC138, a demux to select the line to ground. I try to use the SPI module from Tiva but it didn't work as i expected (i didn't discovered the pattern of this TLC and i was tired to search about it) then i just convert to hardware SPI, like Robg. 
The code works sending each color of each RGB LED, in other words, to write one line you use 24 chars of memory because of this, remember to declare const the data that will be write in the matrix, if not you can overload the heap of the uC. To write in all the matrix, you need to call this function:
 bool SendSSITLC(unsigned char *matrix_t, uint16_t offset,uint16_t limit);
eight times passing a char vector of colors an offset in this vector if you need sure, and the limit of this vector. In the main.c example you will see the Launchpad write in the matrix, but you can change easily, changing the pattern.h file. See above some photos of the matrix and the code running:


Jan 24, 2015

ESP8266 First Impressions

It's Have Been the while since i posted something in the blog , but now i will pay attention and i promise to post at least one new by week . To start again , let 's talk about the IoT revolution called " ESP8266 " ,
this small module is cheaper than an arduino nano because costs $5 bucks, it's ridiculous the chinese price and if you buy in aliexpress or ebay, you'll also see the free shipping. I'm Developing a home automation network and i'm using the Stack of LAMP, but with this module i'm thinking to change the socket communication with the hardware level to MQTT or TCP protocol instead of use the use this guy CC2530-ZigBee(one day i will post something about this). Espressif company launch this module as a solution for IoT and embedded systems, and our chinese friends develop different types of modules with the same IC. Here you will see all names of modules with 8266
OK, like everyone else, i bought this module from china and i will wait a long time to arrive (normal way in Brazil). Some specs of the module are:

  • 802.11 b / g / n
  • Wi-Fi Direct (P2P), soft-AP
  • Built-in TCP / IP protocol stack
  • Built-in TR switch, balun, LNA, power amplifier and matching network
  • Built-in PLL, voltage regulator and power management components
  • 802.11b mode + 19.5dBm output power
  • Built-in temperature sensor
  • Support antenna diversity
  • off leakage current is less than 10uA
  • Built-in low-power 32-bit CPU: can double as an application processor
  • SDIO 2.0, SPI, UART
  • STBC, 1x1 MIMO, 2x1 MIMO
  • A-MPDU, A-MSDU aggregation and the 0.4 Within wake
  • 2ms, connect and transfer data packets
  • standby power consumption of less than 1.0mW (DTIM3)

Seeing this specs wee can have an idea from what is the max range of this device, based in the Friss tranmission equation, let's calculate how is the reach of this module:


Range = [10 ^ (19.5Tx power + 3Rx antenna gain + 3Tx antenna gain + 91Rx Sensitivity  )/20] / 41.88 x Loss Factor
            = 6.53 Km 


Don't call me crazy because this is the max distance in a open transmission with a shielded module and a 3dBi antenna. But if we consider at least 10%, we have 653 meters!. I had tested this module in my house, with the wireless router TG-862 from Arris, and it works perfectly. For the first test i decided to update the firmware, because the module works with AT commands and in the old fw, some commands are not implemented yet like baudrate configuration. To update the fw, you need python 2.7 and a USB RS-232 serial to TTL converter. I'm using Ubuntu 14.04 LTS (Trusty Tahr), but you can use other distro, just clone this repo of esp-tool and download the firmware from this. I chose the v0018000902, because is the last when this post is up. After you download you need to prepare the hardware, it's simple and i will show what i did. The pins from the ESP-8266 are:
First you need to cross between your RX and TX pins from your conversor, then power with a 3.3V source with 200mA of fan out. To enable the chip, just connect CH_PD pin to VCC. Now open a terminal and verify what device is your serial converter, use this command to to this:
ls /dev/tty*
After plug and unplug your device to see which adapter has changed and then after you discover, you put this:
sudo screen /dev/ttyUSB0 115200
When you open the terminal, just put "AT" and after press ctrl+m and ctrl+j (carry return, line feed), if you see an "OK", you're ready to send the commands to the module. This list of commands that i tested are:
AT+RST
AT+CWMODE=3 #Sta+AP
AT+CWJAP="yourwifinetwork","yourpassword" #Get and ip com dhcp
AT+CIPMUX=1 #Multiple connections
AT+CIPSTART=4,"TCP","192.168.0.11",8080 #Connect to tcp server in my ip, localhost through port 8080
AT+CIPSEND=4,12 #Send data to the server
>Hello World!
I used a tcp_server described in python to test the module, but you can use any other to test, if you want my code, just ask here.