Sep 18, 2014

Controlling Robotic arm with TIVA Launchpad

It's been while since i had posted something different from a tutorial, then because of this i will show a simple project to control a robotic arm. In my course on the university there's a old robotic arm called "robix", this is a educational kit that was bought to learn robotic in pascal, but with the over the years this was left for the students that are doing the last project of the course, that here we call this as TCC(final course project). 


Seeing this kit i had thought how to control with the Tiva launchpad ARM, and searching a little about this i discovered that i need to generate six PWM's signals to control the servo motors in the kit. In this picture below you will see how is the signal that you need to generate to control a simple servo motor.

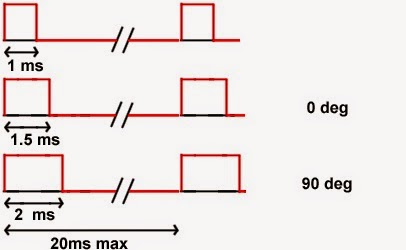
Considering this i read the datasheet to discover how to generate a huge PWM time like 20ms. Viewing the feedback from the E2E forum i discovered that to generate this kind of PWM i will need a longer timer from the uC like the Wide Timer module, configuring this i need to discover the duty cycle from the servo motors in the arm to control the angles. The servo motors from the arm are the MG-995, and in this site you can see some parameters like the duty active of any kind of servo, then with this information i developed a library to control the robot and any kind of motor for the Tiva launchpad. In the "servo.h" file you have some parameters to define how your servo works, like the active duty cycle in micro-seconds for each servo and others.

/****************************************************************************
    ███████╗   ███████╗   ██████╗
    ██╔════╝   ██╔════╝   ██╔══██╗
    █████╗     ███████╗   ██████╔╝
    ██╔══╝     ╚════██║   ██╔═══╝
    ███████╗██╗███████║██╗██║
    ╚══════╝╚═╝╚══════╝╚═╝╚═╝

    SERVO MOTOR - API
    Author: Anderson Ignacio da Silva
    Date: 08/08/2014
    Target:PART_TM4C123GH6PM
    Inf.: http://www.esplatforms.blogspot.com.br

    PWM Pins:
    Channels  |   Pin
       0          PC4
       1          PC5
       2          PC6
       3          PC7
       4          PD0
       5          PD1

    Instructions:
        -To initialize just call InitServo()
        -Change the duty with SendServo(Channel,0-180 degrees)
        -If your servo has a different duty period, you can ch
         ange the time definitions in "servo_api.h"
        -Remember to change the MIN and MAX duty of each servo

****************************************************************************/

#ifndef SERVO_API_H
#define SERVO_API_H
 #include "servo_api.h"
#endif
// #ifndef SERVO_API_H
// #define SERVO_API_H
//  #include "servo_api.c"
// #endif

/*  Definitions       */
#define PWM_FREQUENCY   50
#define PWM_PERIOD      20000  //Time in us

/* Some times for popular motors 
    -Time for max PWM servo (us)   MG995=2100 &  HS422=2300
    -Time for min PWM servo (us)   MG995=500  &  HS422=800 
*/

#define MAX_SERVO_0     1900
#define MIN_SERVO_0      500

#define MAX_SERVO_1     1900
#define MIN_SERVO_1      500

#define MAX_SERVO_2     1900
#define MIN_SERVO_2      500

#define MAX_SERVO_3     1900
#define MIN_SERVO_3      500

#define MAX_SERVO_4     1900
#define MIN_SERVO_4      500

#define MAX_SERVO_5     1900
#define MIN_SERVO_5      500

#define MAX_SERVO_5     1900
#define MIN_SERVO_5      500
//#define DEBUG_SERVO

/*  Prototypes  */
void SendServo(uint8_t SelServo,uint8_t ValServo);
void CfgModPWM(void);
void CalcServo(void);
void InitServo(void);

To control the outputs you can see the .h file that has the instructions of how initialize and send position for the servo motors. To use this code you can copy from my repository in github and share your problems or doubts about the simple api for control servo motors. In this video below you see how the arm controls the robix using this api:


Thanks to read this post and see you next time.

Jul 24, 2014

[ARM]ARM TOOLCHAIN + OPENPOCD + LM4FLASH + TIVA_LAUNCHPAD + ECLIPSE

Hello everyone, i have been busy with my college and other projects, but i want to share a complete tutorial for develop firmware on the TIVA launchpad from texas. It has been a while since texas instruments change your arm family name, now with the TIVA series, some problems may occur when you use this tutorial for the old name[STELLARIS] that i did in a few months ago. In this post you will see that some tools are the same as we have been using in the stellaris family, in fact, the lm4f120 microcontroller has almost the same architecture that tm4c123g and you can flash the same code, but when you use some specific peripherals the instantiated libraries can change and this can be a big problem. This tutorial is based on Doragasu tutorial. We will install all the necessary tools and after, configure the ECLIPSE-CDT to develop our codes with one of the best IDEs to the linux. Alright, lets install all the tools in the "~/tools" folder in your linux distribution.

[DISCLAIMER] - This tutorial is based on debian linux distributions.

ARM toolchain
First we need the toolchain for arm and then add the repository to your ppa directories and install the tool, to simplify our lives:
sudo add-apt-repository ppa:terry.guo/gcc-arm-embedded -y
sudo apt-get update -y &>> /dev/null
sudo apt-get install gcc-arm-none-eabi -y

TivaWare
In the place of StellarisWare, we have now the TivaWare library, to download go to TI website and download the TIVAWARE library (SW-TM4C-2.1.0.12573.exe), after unzip into a folder, lets call “tools” folder in your home directory:
mkdir -p ~/tools/tivaware
sudo apt-get install -y unzip &>> /dev/null
unzip -u ~/Downloads/SW-TM4C-2.1.0.12573.exe -d ~/tools/tivaware
cd ~/tools/tivaware
make

lm4tools
Lm4flash is the programmer for arm and other architectures, you can use OpenOCD to program and load to the microcontroller, but lets use this. Install the dependencies:

sudo apt-get install libusb-1.0-0-dev -y
sudo apt-get install libtool libusb-dev -y
Install git control version:
sudo apt-get install git -y
cd ~/tools
git clone https://github.com/utzig/lm4tools.git
cd lm4tools/lm4flash
make
Add lm4flash programmer to your PATH and udev rules for usb device:
sudo echo "export PATH=$PATH:$HOME/tools/lm4tools/lm4flash" &>> ~/.profile
echo 'ATTRS{idVendor}=="1cbe", ATTRS{idProduct}=="00fd", GROUP="users", MODE="0660"' | sudo tee /etc/udev/rules.d/99-stellaris-launchpad.rules
sudo usermod -aG users $USER 

OpenOCD
Let's build OpenOCD (Open On-Chip Debugger) with ICDI (in-circuit debug interface) support to debug the Tiva-LaunchPad:
cd ~/tools
git clone http://git.code.sf.net/p/openocd/code openocd
sudo apt-get install autoconf automake texinfo 
sudo apt-get -o Dpkg::Options::="--force-overwrite" install gdb-arm-none-eabi
./bootstrap
./configure --enable-maintainer-mode --enable-ti-icdi
make
sudo make install


Installing Eclipse
First install eclipse with:
sudo apt-get install eclipse-cdt -y
And then, open eclipse:
Configuring the project template:
The first screen that you will see is the workspace:


1 - Select "ok" and create your workspace projects into home folder. After goto menu: File > New > Project and select the C project

2 - Go next and select this Executable > Empty Project and Toolchains: Cross GCC, the name you can select anyone, but lets call "template"

3 - After select, click on next and now click on Advanced Settings... 

4 - Now select C/C++ tab, Build>Settings. Change the Configuration: box to [All Configurations], after write in the Prefix box arm-none-eabi-


Remember to select [All Configurations], in the next configurations boxes. 
5 - Click on Cross GCC Compiler>Symbols, and add the symbols PART_TM4C123GH6PM, TARGET_IS_BLIZZARD_RB1, ARM_MATH_CM4, the apply: 

6 - Go to Cross GCC Compiler>Include, and add the way of tivaware (/home/your_user/tools/tivaware)

7 - Select the Cross GCC Compiler>Miscellaneous, and add in the Other flags tab this flags "-c -fmessage-length=0 -mthumb -mcpu=cortex-m4 -mfpu=fpv4-sp-d16 -mfloat-abi=softfp -ffunction-sections -fdata-sections": 

8 - Next, click on Cross GCC Linker>Libraries and add this path "/home/your_user/tools/tivaware/driverlib/gcc", in the Libraries add "driver"

9 - Select the Cross GCC Linker>Miscellaneous and add the flags "-Wl,--static,--gc-sections,-T../ldStart.ld -mthumb -mcpu=cortex-m4"

10 - Go to Build Steps, and add the command "arm-none-eabi-objcopy -O binary ${ProjName}.elf ${ProjName}.bin" and if you want, change the description "Generate binary file from elf file"

11 - Go to Build Artifact tab and add the ".elf" to the Artifact Name box, this instance the output from the compiler: 

12 - After this step, click on "Apply","ok" and "Finish"


13 - In the "Cross compiler prefix:" box, type "arm-none-eabi-" and "Finish" again:

Now we need to add some files to conclude our workspace, like the loader script to the target and the vector of interrupts. Just get this files from:

cd ~/workspace/template
wget --no-check-certificate https://github.com/aignaciors/tiva_arm_template/blob/master/template/ldStart.ld && wget --no-check-certificate https://github.com/aignaciors/tiva_arm_template/blob/master/template/startup_gcc.c && wget --no-check-certificate https://github.com/aignaciors/tiva_arm_template/blob/master/template/main.c

These files are copied into your workspace/template, if you create a new template, remember to copy them into the new. Before we continue, click in Refresh in the template project: 


LM4FLASH on eclipse
1 - Now we need to configure the flasher for your ambiance, lets use lm4tools instead OpenOCD, this can be a little easier for a new template. Alright, in eclipse, just click on "Run>External Tools>External Tools Configuration". Now right click on Program tab and "New"

2 - Now, change the Name to lm4flash, location to "/home/your_user/tools/lm4tools/lm4flash/lm4flash" and Working Directory: to "${workspace_loc:/template/Debug}", in the Arguments: add the binary file, "template.bin"

3 - Now click on "Apply" and then in "Close", if you did Al right now we can program the Tiva Launchpad. First, let's compile our code, click on "Build" to compile the blink green example, and after go to the external tools symbol(see picture below), then click on lm4flash, now you need to connect your board to computer. 

If all it's right, your board will flash the green led. 

OpenOCD on eclipse
Okay, maybe you are sweating at this time, i know that's is very extensive tutorial, but i guarantee that when you finish you will be happy to develop to this target platform. One of the basic tools when you work with microcontrollers is the debug tool, the [OpenOCD] is the right tool when you need to this for our target. Let's configure this tool on eclipse to debug our programs.
1 - Go to Run>External tools and right click on Program>New, as you did for lm4flash. Create with name "openocd". In Location paste "/home/your_user/tools/openocd/src/openocd", Working Directory paste "${workspace_loc:/template/Debug}" and in the Arguments, just paste the script that you will use to debug "-f /home/your_user/tools/openocd/tcl/board/ek-tm4c123gxl.cfg" and then apply: 

2 - Go to Help>Install New Software on the Work With tab, add "CDT - http://download.eclipse.org/tools/cdt/releases/helios" and search for C/C++ GDB Hardware Debugging and install the plugin: 

3 - After go to Run>Debug Configurations, right click on GDB Hardware Debugging and select New, then change the name to gdb, then go to C/C++ Application: and paste "Debug/template_tiva.elf". Modify the Project box to "template" then apply the settings: 

4 - Now go to Debugger tab and uncheck the "Use remote target", paste as GDB command "arm-none-eabi-gdb", and remember to select "Standard GDB Hardware Debugging Launcher" then apply>close

5 - Now go to Startup tab and, uncheck "Reset and Delay(seconds)" and "Halt", paste the gdb commands to initialize "target extended-remote :3333 monitor reset halt" on Run Commands box, just paste "monitor reset init" and then apply: 

6 - Then select Launch Group menu, and create a launch with name Debug, after add in this sequence,Program::Openocd and GDB Hardware Debugging::gdb with Add... then apply: 

7 - Now close and go to debug button, then click on "1 Debug" and if no errors appeared, you probably finished configuring all.


If you reached this step without any problems, then congratulations, you have a perfect environment to develop firmware for the ARM platform. Thanks mainly to the blogger Doragasu. We meet in the next tutorial.

Mar 1, 2014

Git tutorial, a little bit of a powerful tool

Hi, in this post i will show a interesting tool called GIT. If you're a new programmer it's normal to understand that you never heard about git repository, after all, it's a little confuse to understand in the beginning. But, if this is not the first time that you program something, you may had already heard about git and the advantages to use it. A lot of software developers knows the git protocol and for my surprise, i found that there are a lot of hardware developers that never heard about Git. Well, i learned about this protocol by a teacher that helped me to create a organize code and safe version controller for my projects, he always spoke that in bigger projects and companies, this tool is fundamental. Then let's learn what's this protocol and how to use it:

Wikipedia resume: In software development, Git is a distributed revision control and source code management (SCM) system with an emphasis on speed.Git was initially designed and developed by Linus Torvalds for Linux kernel development in 2005. Every Git working directory is a full-fledged repository with complete history and full version tracking capabilities, not dependent on network access or a central server. Git is free software distributed under the terms of the GNU General Public License version 2.

This is a good resume about git and i think there're a lot of information about history of this protocol in the internet, but i think that's more interesting learn about how to use it. I will show some commands and give an example to explain them. First, git is a protocol for a repository, in other words, in some place you will have your source files from your project stored(data local server, cloud servers...) and using GIT, you will be able to upload more files or edit them and for each modification you will have the date and comments. Initially you think, "I don't care about control version, i'm organized enough!", in the beginning i thought the same thing, but with the time you will have three, four...twenty files named "main_v1_0.c" and your single information will be the windows/linux data of creation file and the devil will embrace your shoulders for a time. For who wants to learn about how to create a repo and how to use it with git, follow me in the next steps:

Step 1. Choose a repo:


Well, there're a lot of web repos, but the most famous are Git Hub and Bitbucket, the basic difference is that in git hub your codes will be able for anyone to see and in the bitbucket you have a private repository where you can control who can see or work in the project. Talking about space, both do not have code size limitation, but both recommend that each repo has less than 1GB and about suppoort git hub has a much larger community than BitBucket. I prefer bitbucket because of the privacy, but both are good repositories. 

Let's use to explain the bitbucket, i don't know well but i think that's almost the same thing on github to create a repository on website. 

-First access the website of bitbucket (https://bitbucket.org/)


-Then create your free account and log in.
-Create your first repository.


Ok, you create a account and you already have a repository for a project, now you need to create a copy to your computer where you will develop your project and after modified the files, upload them to the repository. If you pay some attention, you will see that in one step, the site gives you a code like below:

git clone https://esplatforms_test@bitbucket.org/esplatforms_test/tutorial.git

This code is important to you use to copy the repository structure to your computer. If you skipped when it was shown, do not be afraid, you can see this code again in the "clone/https" icon:


Step 2. Configure the client:


If you're a windows/mac user, you can download the tools for git client in this link. After install just open the program and select the directory to add your repository files. Then paste the code "git clone htt..." with "shit+Insert" keys on the terminal emulator. Before you press ENTER and copy the files from repository, add your password after the name of your directory on the command, like "git clone https://name of your repo:password repo(same the website)@bitbucket.org/......" and press enter:


The git protocol will copy all files of your repo to your local computer. After you can enter in your directory and see the files created, you will see threes files that's the same if you click on tab "source" of bitbucket repository. This files comes with the tutorial repo that you created before, in other words, you're sync with the repository and if you type:

git status

You will see that you're up-to-date with the repo and there's nothing to do. Ok, now let's add a file and upload for the repo. First open any text editor and create a simple file, after save it in the repo directory. The git protocol works this way:


First add the files that are in the version that you will send to the repo with "git add", then lock this version with the "git commit" and then send the files to the repo with "git push". I will show an example with the file that i created named "test.txt":


If you note in the bitbucket, you will see that the file was copied to the repository with the commentary that a i put in the terminal. I will put the three commands that i used to demonstrate this sample version: 

git add . #add all files to the version that i will send, you can also send one by one typing git add test.txt ....
git commit -m "Commentary" #Lock the version that will be send to the repo
git push origin master #Send your locked version to the repo
If you use the git in other computer with the same repository, just type "git pull" to update your local repository before work. Still there are a lot of information about git to study, i recommend you to see about "branches on git" after do this tutorial. For while let's finish here and see you next time. Any doubts just comment below and i will be greatful to answer you. Tks All.

Feb 28, 2014

Bash script for compile programs to ARM CORTEX M4F with StellarisWare

Target: LM4F120 Series of ARM Cortex-M4 (Texas Instruments)
OS Platform tested at the moment: Linux Ubuntu 13.04


Hi, in my last post i presented a script to install all tools to start developing in ARM on linux. Now i would like to present a script compiler that helped me when the makefiles didn't work well. I did this to copy the files required to compile from the stellaris folder and after compile all .c files from the target folder pointed by the user. The script asks for the source folder of your project (ex. ~/test_arm), the stellarisware folder library and the name of the main file (test.c). If all occur ok, you will see threes "Complete!", if some "Failed!" appear you will see a file named log_compiler.txt created. In this log_compiler.txt you can see what happened with the compilation. If you have some problem to use, just leave a comment and a i will be greatful to answer you.


Step 1. Create the file:

Just open any text editor, like gedit and paste the script below, after save the file with "name.sh"
SCRIPT:
#!/bin/bash
#Ânderson Ignácio da Silva -2014/1 - www.esplatforms.blogpsot.com.br
#to run just type in terminal sudo chmod  +x compilator.sh, add your password and execute (./compilator.sh)
sudo clear
echo -e "\e[4m\e[1m\e[34m\tCompiler for ARM Cortex M4F - STELLARIS LM4F120 Ver. 1.0"
echo -e "\e[31m\e[1m\e[24m\nAuthor:\e[21m\e[97m Ânderson Ignácio da Silva - http://esplatforms.blogspot.com.br/"
echo -e "\e[31m\e[1m\e[24mOS Tested:\e[21m\e[97m Ubuntu 13.04 or higher"
echo -e "\e[31m\e[1m\e[24mFree source code for everyone. :)\e[21m\e[97m"

echo -n "Your current directory:"
pwd 
read -e -p "Please type the directory folder of the project:" srcDir 
if [[ $srcDir == *~* ]]
then
  srcDir=$(sed -e 's/~//' <<<$srcDir)
  srcDir=$HOME$srcDir
fi
echo $srcDir
read -e -p "Please type the directory folder of the stellaris library:" srcLib 
if [[ $srcLib == *~* ]]
then
  srcLib=$(sed -e 's/~//' <<<$srcLib)
  srcLib=$HOME$srcLib
fi
cd "$srcDir"

echo $srcLib
read -e -p "Please type the name of the main file project(*.c):" srcMainFile

echo "LOG - USER:$USER" &>  log_compiler.txt
echo "      DATE:$(date)" &>> log_compiler.txt

mainC=`echo $srcMainFile | cut -f1 -d'.'`
cp "$srcLib"boards/ek-lm4f120xl/blinky/blinky.ld loader.ld
cp "$srcLib"boards/ek-lm4f120xl/blinky/startup_gcc.c .
files=$(ls *.c | tr '\n' ' ' | tr '\r' ' ' )

echo -ne "Compiling"
for i in {1..10}
do
 sleep .1s
 echo -ne "."
done

arm-none-eabi-gcc $files -g -mthumb -mcpu=cortex-m4 -mfpu=fpv4-sp-d16 \
-mfloat-abi=softfp -Os -ffunction-sections -fdata-sections -MD -std=c99 \
-Wall -pedantic -DPART_LM4F120H5QR -c -I$srcLib -DTARGET_IS_BLIZZARD_RA1 &>> log_compiler.txt

sleep .1s

if  grep -qs "Failed" log_compiler.txt | grep -qs "undefined" log_compiler.txt; then 
 echo -e "\e[31mFailed!\e[97m"
 exit 0
else
 echo -e "\e[34mComplete!\e[97m"
fi

echo -ne "Generating output"
for i in {1..10}
do
 sleep .1s
 echo -ne "."
done

object=$(ls *.o | tr '\n' ' ' | tr '\r' ' ')
arm-none-eabi-ld -T loader.ld --entry ResetISR -o a.out $object --gc-sections &>> log_compiler.txt

sleep .1s

if  grep -qs "Failed" log_compiler.txt | grep -qs "undefined" log_compiler.txt; then 
 echo -e "\e[31mFailed!\e[97m"
 exit 0
else
 echo -e "\e[34mComplete!\e[97m"
fi

echo -ne "Generating bin"
for i in {1..4}
do
 sleep .1s
 echo -ne "."
done

arm-none-eabi-objcopy -O binary a.out "$mainC".bin &>> log_compiler.txt

sleep .1s

if  grep -qs "Failed" log_compiler.txt | grep -qs "undefined" log_compiler.txt; then 
 echo -e "\e[31mFailed!\e[97m"
 exit 0
else
 echo -e "\e[34mComplete!\e[97m"
fi

echo -ne "Cleaning"
for i in {1..4}
do
 sleep .1s
 echo -ne "."
done

rm -rf "$mainC".o "$mainC".d a.out startup_gcc* loader.ld

sleep .1s

if  grep -qs "Failed" log_compiler.txt | grep -qs "undefined" log_compiler.txt; then 
 echo -e "\e[31mFailed!\e[97m"
 exit 0
else
 echo -e "\e[34mComplete!\e[97m"
fi

echo -e "\n\e[34m Compilation Finished!, for details see log_compiler.txt\e[97m"

exit 0


Step 2. Change the permission to execute:

In this step you just need to change the permission to execute the file into your system and for this open the terminal to put the command below:
sudo chmod +u name.sh


Step 3. Executing:

Before to execute i almost lost to advice, but you need to download the Stellaris Ware(SW-EK-LM4F120XL) from this link http://www.ti.com/tool/sw-ek-lm4f120xl and put them into your ~/Downloads directory. And for finish, to execute the script just call them with "./name.sh" like below:
./name.sh

Tks All.

Bash Script to install all tools for ARM - Cortex M4F with StellarisWare on Linux


Target: LM4F120 Series of ARM Cortex-M4 (Texas Instruments)
OS Platform tested at the moment: Linux Ubuntu 13.04


Hi, actually i have been busy with some projects and i don't have so much time to write posts, but don't change the page now because i will present the "magic" script that i have developed. Yeah, you could think that i'm stupid by saying that's a magic script but i would like to note that for new users like me, this can help a lot and with a little changes you can use in other kind of debian distributions systems like PureOS, Debian, Stormix, Commodore OS, Ångström, etc...I wrote this to help me install all tools required to build programs for ARM cortex M4 with Stellaris Ware. The script is pretty simple, it creates a folder to put all files from the repos and make them of recursive form, if you need some help with a problem or error or the script takes a long time to forward, comment and a i will be greatful to answer. This script runs in BASH and you just need to open the terminal (ctrl + alt + t) and change the permission to execute the file. I will show how to do this in the steps below:

Step 1. Create the file:

Just open any text editor, like gedit and paste the script below, after save the file with "name.sh"
SCRIPT:
#!/bin/bash
#Ânderson Ignácio da Silva -2014/1 - www.esplatforms.blogpsot.com.br
#to run just type in terminal sudo chmod  +x arm_installer_stellaris.sh, add your password and execute (./arm_ins....)
var=$USER 
sudo clear

AdjustSystem()
{
  #n-continue same line // e- special chars
  echo -ne "\nAdding repository source of gcc arm..." 
  # argument -y no asking // &-redirect without echo // > - copy return to this file replacing all // >> - > - copy return to this file without replace
  sudo add-apt-repository ppa:terry.guo/gcc-arm-embedded -y &> ~/log_report_installer_arm.txt 
  if  grep -qs "Failed" ~/log_report_installer_arm.txt; then 
    echo -e "\e[31mFailed!\e[97m"
  else
    echo -e "\e[34mComplete!\e[97m"
  fi

  echo -n "Updating source repositories..."
  sudo apt-get update -y &> /dev/null
  echo -e "\e[34mComplete!\e[97m"
 
  echo -n "Installing gcc for arm..."
  sudo apt-get install gcc-arm-none-eabi -y &> ~/log_report_installer_arm.txt
  if  grep -qs "E: Unable to locate package gcc-arm-none-eabi" ~/log_report_installer_arm.txt; then 
    #Fix the reference in terry.guo repo changing saucy by raring
    sudo sed -i 's/saucy/raring/g' /etc/apt/sources.list.d/terry_guo-gcc-arm-embedded-saucy.list
    sudo apt-get update -y &> /dev/null
    sudo apt-get install gcc-arm-none-eabi -y &> ~/log_report_installer_arm.txt
    echo -e "\e[34mRepo bug fixed!\e[97m"
  else
    echo -e "\e[34mComplete!\e[97m"
  fi
}

StellarisInstaller()
{
  echo -en "\nCreating the source folder..."
  mkdir -p $srcFolder/stellarisware &> ~/log_report_installer_arm.txt
  if  grep -qs "Failed" ~/log_report_installer_arm.txt; then 
    echo -e "\e[31mFailed!\e[97m"
  else
    echo -e "\e[34mComplete!\e[97m"
  fi

  echo -en "Download \e[31m\e[1mStellaris Library(http://www.ti.com/tool/sw-ek-lm4f120xl)\e[21m\e[97m..."
  while true
  do
    if [ -f ~/Downloads/SW-EK-LM4F120XL-9453.exe ]; then
      echo -e "\e[34mComplete!\e[97m"
      break
    fi
  done

  sudo apt-get install -y unzip &>> /dev/null
  unzip -u ~/Downloads/SW-EK-LM4F120XL-9453.exe -d ~/$srcFolder/stellarisware &>> /dev/null

  echo -n "Making the library..."
  cd ~/$srcFolder/stellarisware
  make &> ~/log_report_installer_arm.txt
  if  grep -qs "Failed" ~/log_report_installer_arm.txt; then 
    echo -e "\e[31mFailed!\e[97m"
  else
    echo -e "\e[34mComplete!\e[97m"
  fi
}

lm4Install()
{
  echo -ne "\nInstalling some required tools..."
  sudo apt-get install libusb-1.0-0-dev -y &> ~/log_report_installer_arm.txt
  if  grep -qs "Failed" ~/log_report_installer_arm.txt; then 
    echo -e "\e[31mFailed!\e[97m"
  else
    echo -e "\e[34mComplete!\e[97m"
  fi

  echo -ne "Installing git tools..."
  sudo apt-get install git -y &> ~/log_report_installer_arm.txt
  if  grep -qs "Failed" ~/log_report_installer_arm.txt; then 
    echo -e "\e[31mFailed!\e[97m"
  else
    echo -e "\e[34mComplete!\e[97m"
  fi
  
  echo -ne "Clonning gitrepo of lm4tools..."
  cd ~/$srcFolder
  git clone https://github.com/utzig/lm4tools.git &> ~/log_report_installer_arm.txt
  if  grep -qs "Failed" ~/log_report_installer_arm.txt; then 
    echo -e "\e[31mFailed!\e[97m"
  else
    echo -e "\e[34mComplete!\e[97m"
  fi

  cd ~/$srcFolder/lm4tools/lm4flash
  echo -ne "Making tools..."
  make &> ~/log_report_installer_arm.txt
  if  grep -qs "Failed" ~/log_report_installer_arm.txt; then 
    echo -e "\e[31mFailed!\e[97m"
  else
    echo -e "\e[34mComplete!\e[97m"
  fi
}

autoInstall()
{
  echo -ne "Adding lm4flash to usr profile..."
  sudo echo "export PATH=$PATH:$HOME/$srcFolder/lm4tools/lm4flash" &>> ~/.profile 
  echo -e "\e[34mComplete!\e[97m"
 
  echo 'ATTRS{idVendor}=="1cbe", ATTRS{idProduct}=="00fd", GROUP="users", MODE="0660"' | \
  sudo tee /etc/udev/rules.d/99-stellaris-launchpad.rules &>> /dev/null
  sudo usermod -aG users users $var &>> /dev/null
}

openInstall()
{
  mkdir -p ~/$srcFolder/
  cd ~/$srcFolder/
  echo -ne "Cloning openOCD repositories..."
  git clone http://git.code.sf.net/p/openocd/code &> ~/log_report_installer_arm.txt
  if  grep -qs "Failed" ~/log_report_installer_arm.txt; then 
    echo -e "\e[31mFailed!\e[97m"
  else
    echo -e "\e[34mComplete!\e[97m"
  fi

  mv -f code openocd &>> /dev/null
  cd ~/$srcFolder/openocd
  echo -ne "Updating git repo and changing the branch..."
  git fetch http://openocd.zylin.com/openocd refs/changes/22/922/15 &>> /dev/null
  git checkout FETCH_HEAD &>> /dev/null
  echo -e "\e[34mComplete!\e[97m"

  echo -ne "Setting the module..."
  ./bootstrap &>> /dev/null
  ./configure --enable-maintainer-mode --enable-ti-icdi &>> /dev/null
  make &>> /dev/null
  echo -e "\e[34mComplete!\e[97m"

  echo -ne "Installing the openOCD..."
  sudo make install &> ~/log_report_installer_arm.txt
  if  grep -qs "Failed" ~/log_report_installer_arm.txt; then 
    echo -e "\e[31mFailed!\e[97m"
  else
    echo -e "\e[34mComplete!\e[97m"
  fi
}

echo -e "\e[4m\e[1m\e[34m\tInstaller for ARM Cortex M4F - STELLARIS LM4F120 Ver. 1.0"
echo -e "\e[31m\e[1m\e[24m\nAuthor:\e[21m\e[97m Ânderson Ignácio da Silva - http://esplatforms.blogspot.com.br/"
echo -e "\e[31m\e[1m\e[24mOS Tested:\e[21m\e[97m Ubuntu 13.04 or higher"
echo -e "\e[31m\e[1m\e[24mWARNING 1:\e[21m\e[97mRemember to put the stellaris library file (SW-EK-LM4F120XL-9453.exe)\ninto ~/Downloads!"
echo -e "\e[31m\e[1m\e[24mWARNING 2:\e[21m\e[97mVisit http://openocd.zylin.com/#/c/922/ to check the last updates and\nthen update the script of openOCD"
echo -e "\e[31m\e[1m\e[24mFree source code for everyone. :)\e[21m\e[97m"
read -e -p "Type folder name to install:" srcFolder

if [[ $srcFolder == *~* ]]
then
  srcFolder=$(sed -e 's/~//' <<<$srcFolder)
  srcFolder=$HOME$srcFolder
fi

echo -e "\e[31m\e[1m\nStep 1 - Installing GCC-ARM: \e[21m\e[97m"
AdjustSystem;
echo -e "\e[31m\e[1m\nStep 2 - Installing the Stellaris Library: \e[21m\e[97m"
StellarisInstaller $srcFolder
echo -e "\e[31m\e[1m\nStep 3 - Installing lm4tools: \e[21m\e[97m"
lm4Install $srcFolder
echo -e "\e[31m\e[1m\nStep 4 - Configuring auto-tools: \e[21m\e[97m\n"
autoInstall $srcFolder
echo -e "\e[31m\e[1m\nStep 5 - Instaling OpenOCD: \e[21m\e[97m\n"
openInstall $srcFolder

sudo rm -rf ~/log_report_installer_arm.txt &>> /dev/null

echo -e "\e[34m------------------Success!------------------\e[97m"

echo -e "\e[0m"
exit 0


Step 2. Change the permission to execute:

In this step you just need to change the permission to execute the file into your system and for this open the terminal to put the command below:
sudo chmod +x name.sh


Step 3. Executing:

Before to execute i almost lost to advice, but you need to download the Stellaris Ware(SW-EK-LM4F120XL) from this link and put them into your ~/Downloads directory. And for finish, to execute the script just call them with "./name.sh" like below:
./name.sh

Tks All.

Jan 21, 2014

Setting the ARM enviroment on Linux with Cortex M4F - Stellaris


Specification:
Target: LM4F120 Series of ARM Cortex-M4 (Texas Instruments)
OS Platform: Linux Ubuntu 13.1 (saucy)
Advice:The Toolchain used in this post isn't supported in Ubuntu 12.10
LM4F120 internal block diagram

Hi, this is the first post and i will show how to develop a complete linux enviroment to program ARM Cortex M4F with StellarisWare Library, this can help you to develop in a open source enviroment without code size limitations of and many other IDEs selling.


Step 1. Installing arm-none-eabi-gcc:


In the terminal put the code below to add the PPA repositories to your system:
sudo add-apt-repository ppa:terry.guo/gcc-arm-embedded
sudo apt-get update

And just install the package:
sudo apt-get install gcc-arm-none-eabi

Obs.: if you have this error:
E: Unable to locate package gcc-arm-none-eabi
don't give up, just do this:
cd /etc/apt/sources.list.d/
sudo gedit terry_guo-gcc-arm-embedded-saucy.list
and edit the file with:
deb http://ppa.launchpad.net/terry.guo/gcc-arm-embedded/ubuntu raring main
# deb-src http://ppa.launchpad.net/terry.guo/gcc-arm-embedded/ubuntu raring main

After you just need to put again:
sudo apt-get update
sudo apt-get install gcc-arm-none-eabi


Step 2. Installing Stellaris Ware:


Download the StellarisWare Library (SW-EK-LM4F120XL-9453.exe), create the folders in your home and unzip:
mkdir -p ~/stellaris/
unzip ~/Downloads/SW-EK-LM4F120XL-9453.exe -d ~/stellaris/
cd ~/stellaris/
make


Step 3. Installing the lm4tools:


First install some tools that you may need to download the bin:
sudo apt-get install libusb-1.0-0-dev
And then clone the repository into your folder:
mkdir -p ~/lm4flash_dev/
cd ~/lm4flash_dev/
sudo apt-get install git
git clone https://github.com/utzig/lm4tools.git
After the repository ready, just make the library:
cd lm4tools/lm4flash
make
Now, add the lm4flash to you path in .profile:
sudo gedit ~/.profile

and in the end line of the file just paste this:
export PATH=$PATH:$HOME/lm4flash_dev/lm4tools/lm4flash


In this step, restart your session to load the path of lma4flash... All right you are almost just finishing, you just need to adjust the permissions to other users download the firmware to the ARM and for this just put:
echo 'ATTRS{idVendor}=="1cbe", ATTRS{idProduct}=="00fd", GROUP="users", MODE="0660"' | \
 sudo tee /etc/udev/rules.d/99-stellaris-launchpad.rules
sudo usermod -aG users (Put here the other user, not root)
And finally, just download the sample of blinky:(Remember to put the switch PWR_SELECT in DEBUG mode, and sure connect the board to the usb -> pc)
lm4flash stellaris_test/boards/ek-lm4f120xl/blinky/gcc/blinky.bin

If the led blinky in green color you did all right and you can do the next tutorial. ^^
Tks All.